I have four beautiful kids, two girls and two boys, in that order. I missed my chance to build my girls a playhouse when they were young. Now they are too old for playhouses... or rather, they grew and it won't be long before they need houses too big for me to build. My boys are still young, still into forts and teepees and digging for treasure under the porch. I decided to not miss this chance to build a great tree house for them. And I decided to make it big enough for the girls and their friends to enjoy too.
I am not a builder, carpenter or handyman - you will see that if you look closely at my photos. Because of that I strongly recommend that on structural and safety issues you do your own homework and consult experts where you feel unqualified. But I have done a lot of research (a tendency that sometimes frustrates my wife), looked at dozens of web sites and YouTube videos about building tree houses and general carpentry. I thought I'd return the favor that the most helpful sites did me by recording this project on this blog. And maybe someone considering building a tree house for his or her kids will learn from my mistakes.
[ Since Blogger has no way of sorting posts with the oldest at top, I date these on the same day, and adjust the times so you can follow this project as you read down the page. ]
Sunday, April 25, 2010
Learning from the Experts

I read reviews of many tree house books and decided on Tree Houses You Can Actually Build: A Weekend Project Book by David and Jeanie Stiles. The Stiles have been building tree houses, cabins and playhouses for over 30 years and have faced almost every situation and made almost every mistake. Who better to be my mentors on my first "real" tree house project. The Stiles publish many books on building tree houses, but this one had ample, clear illustrations and text where most needed. It does not have all the answers, but it is full of practical advice on most major issues and gives many examples and optional features for many kinds of tree houses. This book has been my constant companion throughout this project.
I also found many YouTube videos helpful - some for inspiration, some for practical advice. Here are a couple:
How to build a treehouse by Meadowview Construction - A short video showing the progress of a professionally built treehouse. More for inspiration, but I found a few helpful things in the video.
Charming Treehouse - A time lapse video of a beautiful treehouse in upstate NY in the fall. Far fancier that I could build, but great for dreaming.
I will add to this as I remember things that helped and as I run into new resources.
On Tools: The Stiles recommended many tools, but I started out with an old, corded drill, circular saw, tape measure, small combination square with level and the usual hand tools. Following several recommendations I bought a cordless drill. Having two drills - one for drilling pilot holes and one for sinking screws - was a huge help. It also gave me a way to involve my boys. They drilled pilot holes or sank screws while I did the other. I also bought a 36-inch-long level for leveling long boards. Later my father-in-law gave me on old circular mitre saw to use. This made cutting wood a breeze, especially when I needed to cut several pieces at the same angle. You will need a long level for leveling your platform and walls.
Safety First
In all your plans and work on your treehouse, err on the side of safety. I worked in the transplant industry for eleven years. I once heard a report of a young boy who died in a fall from a new treehouse that was eight-feet off the ground. He hit the ground just the wrong way. Enforce safety at all times. Model safety whenever you're working with your kids and their friends. Be firm when you see anyone acting up on the treehouse. Blackball anyone who repeatedly acts irresponsibly. If you are not comfortable with this advice, do not build a treehouse.
Where to Build?
Being in the Southeast pine dominate. Tall but soft these trees have few branches that can support a tree house or any platform really. But our back yard has several tall, strong pines that have stood through many heavy storms and at least one tornado that passed overhead.
The Stiles' book that I am using, Tree Houses You Can Actually Build, has designs for one to four tree designs and good advice about where to build. Beside our swingset sit two tall, strong pines that seem like perfect candidates for a two-tree design. They seem healthy and undamaged and are both seem think enough to share the support for our tree house.
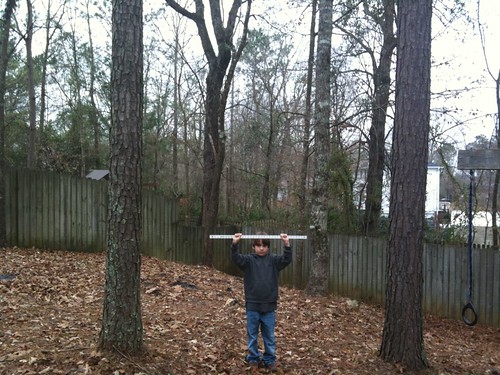 With Timothy, our youngest, I head out to photograph our proposed location. He stands between the trees and holds a yardstick to give me a scale. I plan to use this as the base for a drawing of the treehouse. Looks like a good location: near our swingset, not too close to the house to detract from it's appearance, angled nicely and on the side next to the boys' best friend's house.
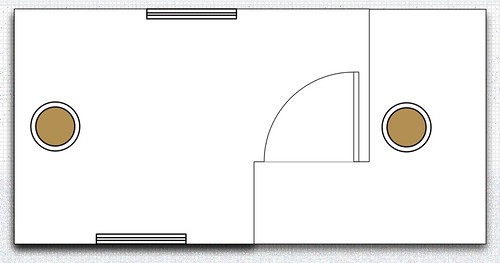
Now inside to decide on a design. I read the whole Tree House book to get the big picture and to understand my option. I learn so much on everything from level platforms, roofing options, supports, ladders, trap doors, and so on. With the trees eight feet apart I decide to make the treehouse 12 feet by seven feet with an L-shaped porch within that space. Here are my conceptual drawings:
The Stiles' book that I am using, Tree Houses You Can Actually Build, has designs for one to four tree designs and good advice about where to build. Beside our swingset sit two tall, strong pines that seem like perfect candidates for a two-tree design. They seem healthy and undamaged and are both seem think enough to share the support for our tree house.
Now inside to decide on a design. I read the whole Tree House book to get the big picture and to understand my option. I learn so much on everything from level platforms, roofing options, supports, ladders, trap doors, and so on. With the trees eight feet apart I decide to make the treehouse 12 feet by seven feet with an L-shaped porch within that space. Here are my conceptual drawings:
(In case you're wondering what I used for the drawings, I brought the photo of Timothy into OmniGraffle - Mac only, sorry - set the scale, traced the tree trunks, hid the photo layer, then drew the treehouse over the trunks.)
A Word About Costs and Other Things
I used to work with civil engineers and I have managed various projects for companies I've worked for over the years. I've estimated many projects. I tried to estimate the cost of materials for our treehouse and to economize where possible. One big cost that I did did not account for was decking screws.
A one pound box of coated decking screws costs seven to nine dollars. A five pound box costs around $28. I have probably spent at least $150 on screws alone and I'm not finished! You definitely need several sizes for different tasks. Half-inch lag screws, bolts and washers are expensive as are metal joist brackets, if you choose to use them.
I've bought several smaller drill bits used for pre-drilling pilot holes. These bits break easily, especially if you let your kids help you. Just buy a bunch and don't get on to the kids too harshly. It takes skill and sustained attention to drill dozens of pilot holes for floor boards, so either resign yourself to breaking several bits - or don't let your kids help you and lie about not breaking any yourself (kidding).
Disregard if you're a skilled carpenter: If you need a board cut and one eight-foot board is just enough for three peices of whatever, buy the ten foot board. I've run just barely short a few times and wished I'd paid the extra $3 for the longer board.
A one pound box of coated decking screws costs seven to nine dollars. A five pound box costs around $28. I have probably spent at least $150 on screws alone and I'm not finished! You definitely need several sizes for different tasks. Half-inch lag screws, bolts and washers are expensive as are metal joist brackets, if you choose to use them.
I've bought several smaller drill bits used for pre-drilling pilot holes. These bits break easily, especially if you let your kids help you. Just buy a bunch and don't get on to the kids too harshly. It takes skill and sustained attention to drill dozens of pilot holes for floor boards, so either resign yourself to breaking several bits - or don't let your kids help you and lie about not breaking any yourself (kidding).
Measure twice, cut once.
Disregard if you're a skilled carpenter: If you need a board cut and one eight-foot board is just enough for three peices of whatever, buy the ten foot board. I've run just barely short a few times and wished I'd paid the extra $3 for the longer board.
Foundation
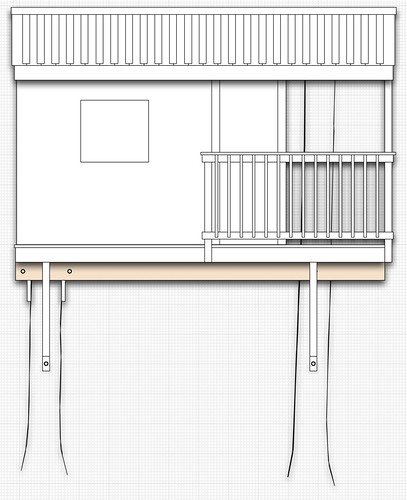
As with everything else a foundation has to be solid. I bolted four 2x8x12s in pairs to both sides of the pine trees and framed the floor on top of this. Feeling confident in the strength of my 2x8x12 "foundation" I decided to make the tree house 12' x 8' instead of 12' x 7'. This saved cutting a foot off each 2x6x8 also.
For the floor I started with two 2x6x8 joists centered and bolted to each tree perpendicular to the center line between my 2x8x12s. (One pine was slightly thinner so the supporting boards were not parallel.) I then marked the same distances on two 2x6x12s and screwed them to each side of the perpendicular boards. Then I added the end 2x6x8s and the remaining floor joists. I couldn't have done this without my neighbor, David.
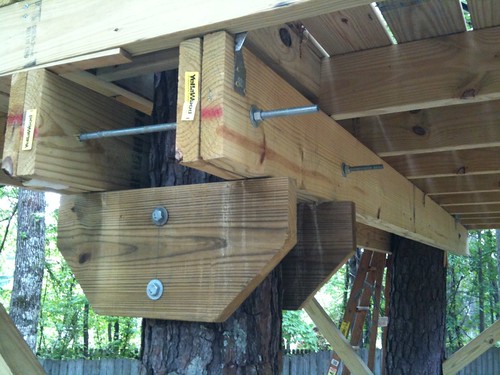
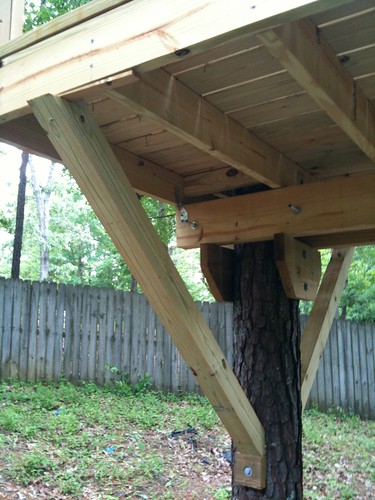
To keep the platform from rocking and to provide support for the corners, I put 4x4s at 45 degrees from the tree trunks to the outer edge of my platform. One end was notched to hold the platform side and the other was cut to rest against the tree and on top of a block bolted to the tree. Both ends were first fastened with long deck screws. Here's a detail shot:
On Wood and Home Depot: All wood that will remain exposed to the outside is pressure-treated pine. I bought most of my wood at my local Home Depot. They offer YellaWood which I like because it is a lighter than the treated wood at Lowes. I'm sure Lowes employees are just as nice, but I commend the employees at my local Home Depot. They have been very patient and helpful throughout this project.
For the floor I started with two 2x6x8 joists centered and bolted to each tree perpendicular to the center line between my 2x8x12s. (One pine was slightly thinner so the supporting boards were not parallel.) I then marked the same distances on two 2x6x12s and screwed them to each side of the perpendicular boards. Then I added the end 2x6x8s and the remaining floor joists. I couldn't have done this without my neighbor, David.
To keep the platform from rocking and to provide support for the corners, I put 4x4s at 45 degrees from the tree trunks to the outer edge of my platform. One end was notched to hold the platform side and the other was cut to rest against the tree and on top of a block bolted to the tree. Both ends were first fastened with long deck screws. Here's a detail shot:
The platform is rock-solid. I've had seven or eight people on it and it has never budged or creaked.
On Screws: You definitely want to use deck screws instead of nails for your treehouse. Screws are not only stronger, but they can be easily removed if you make a mistake or have to loosen a board. I had a few boxes of Phillipshead deck screws that I had bought to repair our deck. When these ran out I bought a bigger box of screws and noticed when I got home that they took a "Star drive" bit (included in the box) or Torx screw driver. These were SO MUCH EASIER to use that the Phillipshead screws. They held on the bit better so were harder to strip. I HIGHLY recommend using these instead of Phillipshead screws.
Walls
I decided to make the walls about 6.5 feet tall - tall enough for most adults and not too tall to make the house look out of proportion. My neighbor, David McKinley gave me a hand assembling the walls on his driveway. Having another person to help lay out, cut wood and assemble the walls was great. The kids got into holding the wood as David guided it into the mitre saw. The kids helped us screw the studs into the top and bottom pieces.
Once we had the walls assembled, we screwed them in place on the treehouse deck. Having a strong friend's help was crucial - many thanks David! Not only was David a help getting the walls up onto the treehouse, but also keeping them straight as we screwed them in place and the together. Once the walls were in place we nailed diagonal boards to the walls and the floor to steady them while we built.

After the walls were up I screwed another "layer" of 2x4s on top of the walls for stability and to provide a place for the roof to attach. (This is not shown in the photo above.)
Unfortunately, after this I didn't get back to the treehouse for several months. Part of my delay was limited time and money and a big trip to Africa, but a major roadblock was the roof. The more I looked into how to build the roof the more choices I had. I was frozen by all the choices. Finally a good friend who is a master carpenter came to my rescue, but that's a story for the next post.
Long Delay - March 28, 2012
A huge project for a nation-wide medical client took most of my free time in 2011 and part of 2012. As I pushed electrons across the internet days, nights and most weekends, the yearning grew to once again smell fresh sawdust, hear electric tools and hammers and to apply hands and heft to this unfinished tree house.
Just before my project started two friends helped me put the roof on the tree house and I shingled it... mostly. I am now putting up the siding. I hope to update this blog by the end of April - the two-year anniversary of starting this project!
Just before my project started two friends helped me put the roof on the tree house and I shingled it... mostly. I am now putting up the siding. I hope to update this blog by the end of April - the two-year anniversary of starting this project!
Subscribe to:
Posts (Atom)